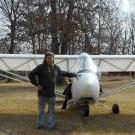
Posted 6 Jan 2017 Hi guys! Thought I already made a post on this subject, but I was wrong! I'll try again.After my inventory of the my newly boughten kit, the conclusion is that the majority of the kit is here. The guy who sold it to me had been cleaning and sanding on the fuselage: rust which had bled through, paint voids and such. He was planning on touching up those areas with the epoxy chromate that was used before. I'm thinkin' No. I'm thinkin' sandblast and powder coat the whole thing. Before that takes place I may want to add more support. A friend of mine noticed a uncovered kit for sale on Barnstorms which had additional support welded in. The support consisted of tubular support under the seats and gusseting welded in below the cockpit and above the mains. I would've never considered doing this. I thought she looked pretty stout. Anybody else do such a thing? I ain't plannin' on any aerobatics!A couple of more questions: The book calls for horses to build the wings. I'm thinkin' a 4'X16' table. Did y'all use tables? And do y'all see any adhesion issues gluing the fabric to a powder coated surface?Here's a picture of what they did:Wyatt Share this post Link to post Share on other sites
Posted 6 Jan 2017 (edited) Yes, You posted this and a couple of us answered it - the first post is in the Kitfox and Avid Suppliers section? Again, Look at TJay's posts about Kitfox 1 building, and you will see a good example of steel plates with lightening holes added to the sides and to the cross gear / seat truss. Those 2 black tubes in the photo above will not work with a fiberglass seat, and do no good to strengthen the truss. 1avidflyer also answered the first post with a link to his photos. A table might do for building wings if you block the spars up like 2 sawhorses - if you read the builder manual you will understand why. Also, the general feeling of a lot of the members is that the manual gives too much (1 1/2") of twist to the wings and you should only use about 1/2" to 1" for better cruise speeds. EDMO Edited 6 Jan 2017 by EDMO Share this post Link to post Share on other sites
Posted 6 Jan 2017 Hiya EDMO! Wander where that post ended up! I'm losing stuff all the time, always puttin' it somewhere where I can find it! I thought I posted it in General Hanger.I'm not really concerned about speed, more about stability. Heck, I'm retired! I ain't in a hurry to get anywhere! How would cutting down on the twist affect stall speed? Heck, my manual says, "THE REAR SPAR AT THE WINGTIP SHOULD BE TWO (2) inches HIGHER THAN THE ROOT END OF THE SPAR WHEN THE WING IS RIGHT SIDE UP."Yes, I would have to shim the spars up to allow for twist and the camber of the ribs. Thought a table would be a nice solid building platform. I know I'm gonna kick a saw horse and move everything.Hey EDMO, you ain't heard anything from from Dave0415? If you or anyone else has an Avid or building one, I'd love to pay you a visit! I'm central Illinois and ain't afraid of drivin'!Wyatt 1 person likes this Share this post Link to post Share on other sites
Posted 6 Jan 2017 (edited) Hiya EDMO! Wander where that post ended up! I'm losing stuff all the time, always puttin' it somewhere where I can find it! I thought I posted it in General Hanger.I'm not really concerned about speed, more about stability. Heck, I'm retired! I ain't in a hurry to get anywhere! How would cutting down on the twist affect stall speed? Heck, my manual says, "THE REAR SPAR AT THE WINGTIP SHOULD BE TWO (2) inches HIGHER THAN THE ROOT END OF THE SPAR WHEN THE WING IS RIGHT SIDE UP."Yes, I would have to shim the spars up to allow for twist and the camber of the ribs. Thought a table would be a nice solid building platform. I know I'm gonna kick a saw horse and move everything.Hey EDMO, you ain't heard anything from from Dave0415? If you or anyone else has an Avid or building one, I'd love to pay you a visit! I'm central Illinois and ain't afraid of drivin'!Wyatt I haven't heard from Dave0415 lately, but think he was on the site not long ago. - Shoot him a PM. You can use a table, but have to level both spars and block up the rear spar - You will need to reach the spars from both sides - I don't recommend the 2" of twist, or even 1 1/2", but that is your call. It should not affect your stall speed - The inside part of the wing stalls first, and the speed is more affected by the weight of your plane. Right now, I don't think you would learn anything by looking at my Kitfox parts. EDMO Edited 6 Jan 2017 by EDMO Share this post Link to post Share on other sites
Posted 6 Jan 2017 (edited) Thought a table would be a nice solid building platform. I know I'm gonna kick a saw horse and move everything.Wyatt - I can kick a table leg just as easy as a sawhorse leg, so I screwed the sawhorse legs to wood blocks glued to the floor. Very solid, easily removed when done. Also added some adjustable wing cradles to bungee the spars to when leveling and building twist into the wings. Worked great, no movement at all.Used three bubble plus a water level to get the twist, didn't want to make the mistake of setting a single bubble level on a different edge, up/down/end orientation on wing tip/root end, etc. In hindsight, I do wish I had used 1" twist vs. the factory manual 1-1/2" twist in my long speed wings, but I was pretty new to the Avid building thing back then. I certainly would not hesitate to use 1-1/2" (1/2" less than directed in the Avid build manual) with a HH or STOL wing build. In fact, today I would probably use 1" there as well.Wings seemed a bit intimidating at first but I enjoyed the process. Have fun! Edited 6 Jan 2017 by dholly 2 people like this Share this post Link to post Share on other sites
Posted 7 Jan 2017 Thanks! You guys are awesome!Jim, I saw the truss reinforcement you did. While there I also saw seat support by wfletch. If I put the added gusseting above the mains too, I'll be flyin' a tank! Perforating the iron some would lighten' her up though. It'd weigh a bit, but I think it wouldn't be an issue. Total (guess): 5lbs max. All I'm seein' on the pull sheets is a sling and cushion for seat. Didn't see anything in the building manual about installation either. Got 'em, but there's got to be a better way. Yeah Ed, I'm still torn about powder coatin, but I do see your point. Powder coatin' does a heck of job, but hard to get off when it's on. I saw TJays Kitfox 1 build (outstanding too) and so I know there'll probably be addons and changes. Yessir! I'm gonna build the wings on horses with cradles glued to the floor. dholly, you're a genius! You know, lookin at the manual, they're buildin' just a basic airplane. I want to build something more, something nice! After seein' what TJay has got, all I can say is "I want that!" I been into the forum and looking at the manual all day. My head's justa spinnin' with questions. One thing at a time!Thanks again for your help. Be talkin' too ya'!Wyatt Share this post Link to post Share on other sites
Posted 12 Jan 2017 (edited) I would not think twice about putting in the trusses under the seat and on the fuse sides. One good bounce will ruin your day. Add a few pounds on a bad landing wont end up in a trip to the hospital and a bent up plane. Especially if you plan on installing wider or longer gear. Even using ply and gluing it in versus welded plate works. There is no way I would build another set of wings with more than 1/2" of washout in them. You leave a ton of performance on the table with the 1 1/2" washout in my book. Edited 12 Jan 2017 by akflyer Share this post Link to post Share on other sites
Posted 12 Jan 2017 (edited) I would not think twice about putting in the trusses under the seat and on the fuse sides. One good bounce will ruin your day. Add a few pounds on a bad landing wont end up in a trip to the hospital and a bent up plane. Especially if you plan on installing wider or longer gear. Even using play and gluing it in versus welded plate works. There is no way I would build another set of wings with more than 1/2" of washout in them. You leave a ton of performance on the table with the 1 1/2" washout in my book. "Even using play and gluing it in........." ? Leni, Is "play" what they call plywood on the slope? Ys, We all need a poofreeder! Ha! Totally agree with all you said. EDMO Edited 12 Jan 2017 by EDMO 1 person likes this Share this post Link to post Share on other sites
Posted 12 Jan 2017 I would not think twice about putting in the trusses under the seat and on the fuse sides. One good bounce will ruin your day. Add a few pounds on a bad landing wont end up in a trip to the hospital and a bent up plane. Especially if you plan on installing wider or longer gear. Even using play and gluing it in versus welded plate works. There is no way I would build another set of wings with more than 1/2" of washout in them. You leave a ton of performance on the table with the 1 1/2" washout in my book. "Even using play and gluing it in........." ? Leni, Is "play" what they call plywood on the slope? Ys, We all need a poofreeder! Ha! Totally agree with all you said. EDMOfixed it... damn it must have been too early in the morning for me. 1 person likes this Share this post Link to post Share on other sites
Posted 14 Jan 2017 Hey guys!Yes, I'm gonna beef 'er up. Figuring on gusseting with lightening holes. I plan to beef up the truss and the areas both sides below the cockpit and above the mains. I've got poster paper to cut and number for templates. When I get them in, I'll take pictures to submit for your approval!Wyatt Share this post Link to post Share on other sites
Posted 14 Jan 2017 What's the right way to measure the wash out on my plane with it ready to fly ? Also what's going to change if I take some out ? Share this post Link to post Share on other sites
Posted 14 Jan 2017 If you use a 4' level, measure the difference front to back of the wing at the fuselage and at the wing tip. Say you had 6" at the fuselage, and 4 1/2" at the tip. That would mean you had 1 1/2" of wash out. Hard to change that on an Avid with an adjustment on only one lift strut. Kitfox would be easier, but you will also be twisting all the glue joints to some extent. JImChuk Share this post Link to post Share on other sites
Posted 14 Jan 2017 Ehhh pass on that idea until I stop flying long enough to recover and paint it Share this post Link to post Share on other sites
Posted 14 Jan 2017 Wyatt - a looong time ago when Avid Flyers were being tested by the European Civil Aviation Authority to allow import from the US, they dictated additional fuselage strengthening measures before approval. These are separate from the modifications already discussed and I've attached a diagram of the changes. It's in metric and a bit difficult to figure out (do not attempt after adult beverages), but after a bit of eye squinting and head scratching it should become clear. Share this post Link to post Share on other sites
Posted 14 Jan 2017 Doug, Have there ever been any reports of bending or failure, excluding crashes, of the U.S. Avids in that area that didn't get reinforced? EDMO Share this post Link to post Share on other sites
Posted 14 Jan 2017 Those CAA engineers in the UK were probably the same ones that insisted that the aluminum reinforcements be added to the Kitfox rib tails - although that was not a bad idea. EDMO Share this post Link to post Share on other sites
Posted 16 Jan 2017 Wyatt,I am still around. Been spending my computer time researching on Yamaha engine conversions for our birds.(subject for another thread) I am going to be adding fuselage reinforcements to both of my Avids. If anyone wants to be able to get these as a set premade with the lightening holes already cut let me know. I have a CNC table and will be measuring / test fitting on both my fuselages as I develop them. Now the first of my questions what do you feel is the best thickness for the gussets? Second question Is there a specific spot where you have seen the most failures? I.E more strength needed here.Thanks,Dave in Western IL Share this post Link to post Share on other sites
Posted 17 Jan 2017 Wyatt,I am still around. Been spending my computer time researching on Yamaha engine conversions for our birds.(subject for another thread) I am going to be adding fuselage reinforcements to both of my Avids. If anyone wants to be able to get these as a set premade with the lightening holes already cut let me know. I have a CNC table and will be measuring / test fitting on both my fuselages as I develop them. Now the first of my questions what do you feel is the best thickness for the gussets? Second question Is there a specific spot where you have seen the most failures? I.E more strength needed here.Thanks,Dave in Western ILI used .035 4130 plate Share this post Link to post Share on other sites
Posted 17 Jan 2017 Wyatt,I am still around. Been spending my computer time researching on Yamaha engine conversions for our birds.(subject for another thread) I am going to be adding fuselage reinforcements to both of my Avids. If anyone wants to be able to get these as a set premade with the lightening holes already cut let me know. I have a CNC table and will be measuring / test fitting on both my fuselages as I develop them. Now the first of my questions what do you feel is the best thickness for the gussets? Second question Is there a specific spot where you have seen the most failures? I.E more strength needed here.Thanks,Dave in Western ILI plated the sides of mine from the strut attach to the fire wall and across the seat truss. I have beat mine up pretty darn good and bent 3 or 4 sets of axles with no fuse issues. I kind of like having the area under my butt a little tougher and I hope that in the event of a crash it will help out a little bit as well. I will trade a pound or two of strengthening for a very real possibility of a wrecked plane due to a bounced landing as others have had.CNC Table.. hmmmm... we may need to talk! Share this post Link to post Share on other sites
Posted 18 Jan 2017 Tjay,Did you go with gussets or the big plate mod AKA Alaskan Tundra Runner on yours? (Sorry AKFlyer too big of a target there) Dave 1 person likes this Share this post Link to post Share on other sites
Posted 18 Jan 2017 (edited) Tjay,Did you go with gussets or the big plate mod AKA Alaskan Tundra Runner on yours? (Sorry AKFlyer too big of a target there) DaveDave, Go to Kitfox 1 section and find TJay's "Starting my Kitfox 1 build pictures here" - On page 1, scroll down to about 30 Nov, and you will see his side reinforcements with all the lightening holes in them - Looks Good. Several pages posted by TJay, so there may be more photos you want to look at. Av8r3400 posted some too - Maybe in Kitfox IV?EDMO Edited 18 Jan 2017 by EDMO Share this post Link to post Share on other sites
Posted 20 Jan 2017 Interesting pics. For me to do a set for KFs I would have to have templates or drawings and someone to test fit them as I don't have a KF air-frame (be a good place for EDMO to volunteer since he is close to me) Dave in Western IL Share this post Link to post Share on other sites
Posted 20 Jan 2017 (edited) Interesting pics. For me to do a set for KFs I would have to have templates or drawings and someone to test fit them as I don't have a KF air-frame (be a good place for EDMO to volunteer since he is close to me) Dave in Western ILI would volunteer, but 2 of mine are clones - a KF1 clone, and the other one is modified and might not match, and the KF3 is all bent in that area right now. Sounds like you may have some Avids to do tho. Maybe someone with a standard Kitfox will make a pattern for you. Sorry, EDMO Edited 20 Jan 2017 by EDMO Share this post Link to post Share on other sites